Metro Sign Build: Hardware + Software Setup
Build Log 2
Now that we’ve got our components in hand, let’s get to “hello world.” A lot of the following is mostly cribbed from existing Adafruit tutorials, which I’ll be heavily referencing, but I’ll add my personal experience and recommendations as we go. Now that we’re diving into implementation instead of just buying things, I’ll reiterate that I by no means know the best way to tackle this project, and if you have improvements please let me know (hit me up on Twitter!@tristanamond). I’ll call out specific questions that I still have and hopefully come back at some point with better answers!
Hardware Setup
Power Management
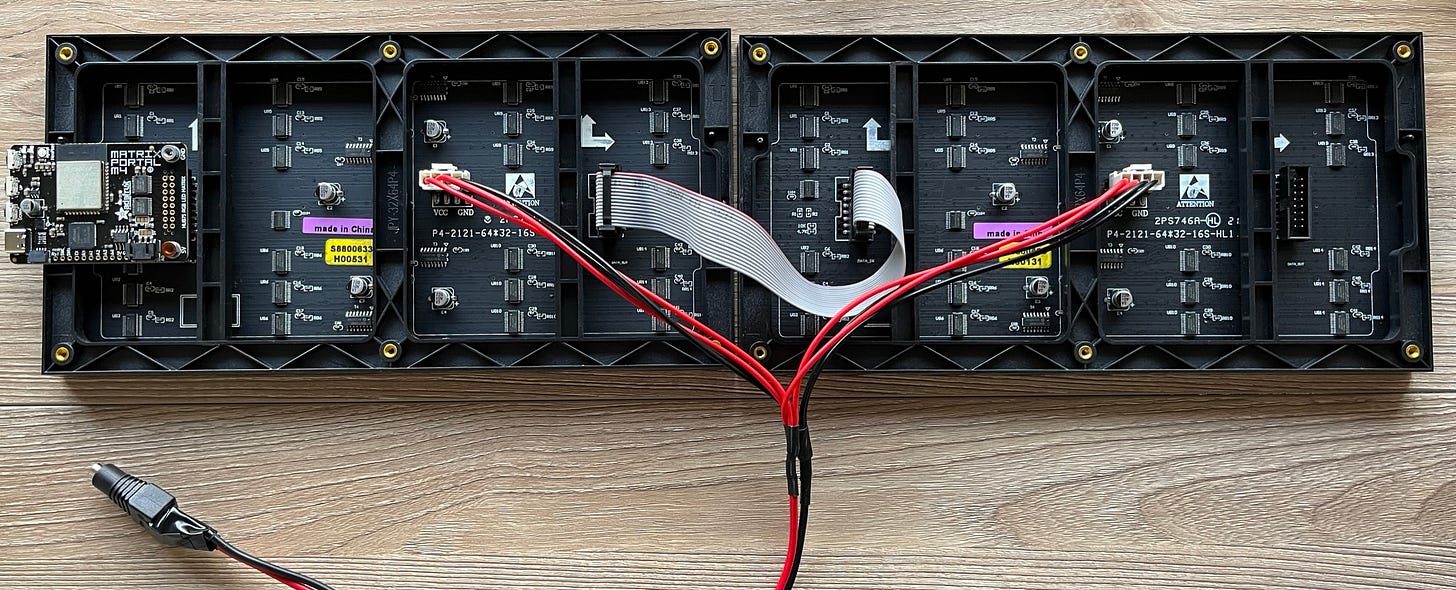
I’m currently using two power sources for this project: one for the Matrix Portal (regular 5V USB-C power block) and a 10A power supply for the 2 LED panels. Knowing that the maximum draw from the 2 LED panels is ~8A, I think I’d have enough left over to power the Portal given that USB-C supports a max 3A draw, given that I’m not running all the LEDs on the boards at the same time. Do you know electronics better than my brief high school education? Let me know!
If you choose to go the same route I did, it’s incredibly simple to get everything set up1. Use any 5V power supply for the Portal; you probably have a dozen of these laying around. The LED panels are a bit trickier; I chose to overshoot with the 10A power supply, but hopefully that’ll pay dividends down the road if I can also power the Portal with it. Regardless, if you’re only going with one panel you can get away with a 5A power supply, but more than one will require something beefier. Don’t forget the adapter either! My Portal came with spade adapters, so I was able to easily screw those into the adapter, wrap the whole thing in electrical tape, and call it a day.

Data Management
Luckily the data transfer is much easier! The included IDC cables can be easily connected to chain more than one display together. In my case, the output was on the “right” side of the board, opposite the shield connection, and connected to the “left” side of the chained board; both had arrows pointing up and right, but all the data connectors had those so your mileage may vary. The good news is trial and error is your friend here, or you can check the Adafruit guide2.
Software Setup
CircuitPython Installation
I don’t have a ton to add to the Adafruit guide3 (and it’s pretty simple!), but I can share a few areas I went wrong.
Using MacOS instead of Windows
I was unable to get MacOS to recognize write privileges when connected to the Portal, so I switched over to a Windows machine and didn’t have any issues with it; same cables, USB-C to USB-C, so…🤷♂️
Not saving my work frequently enough
I found the Matrix Portal to be a bit fragile; any Mu crashes would wipe the Portal, and I’d have to re-flash the UF2 file, so hold onto that file and keep frequent backups! If you’re familiar with Github you’re probably already on top of this, but I lost some work multiple times from poorly-timed Mu crashes
Paring down the CircuitPython libraries too quickly
While the guide above notes that the recommended libraries are the bare minimum, take some time to look at the other available libraries in the CircuitPython bundle; there’s some helpful stuff, not to mention some libraries that are required for this project.
Required CircuitPython Libraries
If you’d like to keep following along with this guide, you’ll need the following libraries installed. I’ve divided them up into the absolute bare minimum for our original MVP, then added a few more for subsequent iterations we get into. I’ll try to note when we add more libraries during the log and keep this list updated as we expand the project, but if you want to grab everything in one fell swoop this is the list you’ll want!
MVP
adafruit_matrixportal
adafruit_esp32spi
adafruit_display_text
adafruit_bitmap_font
board
busio
gc
json
neopixel
terminalio
time
Iteration 1: Sensors
adafruit_apds9960
Hello World!
If everything has gone smoothly so far, you should be able to start writing code! Adafruit recommends using the Mu editor for CircuitPython, which I’ve found to be relatively solid; doesn’t have the features you’d get with a full IDE, but there’s nothing I’ve found myself really missing that dragged down my productivity. If anyone has recommendations on a better editor or a way to integrate with an IDE such as PyCharm, I’m all ears!
Once you open code.py on your CircuitPython drive, you can immediately write out your first line to make sure everything is working:
print(“Hello world!“)Make sure you have the Serial toggled on in Mu and save code.py to run it. If everything is good so far, you should see your text in the serial readout!
Next Steps
Now that we’re able to program the MatrixPortal M4, we can start building ourselves a manager for the display functions. Next log, we’ll cover how to get some basic text on the display and sending text to our display manager from our main loop!

